|
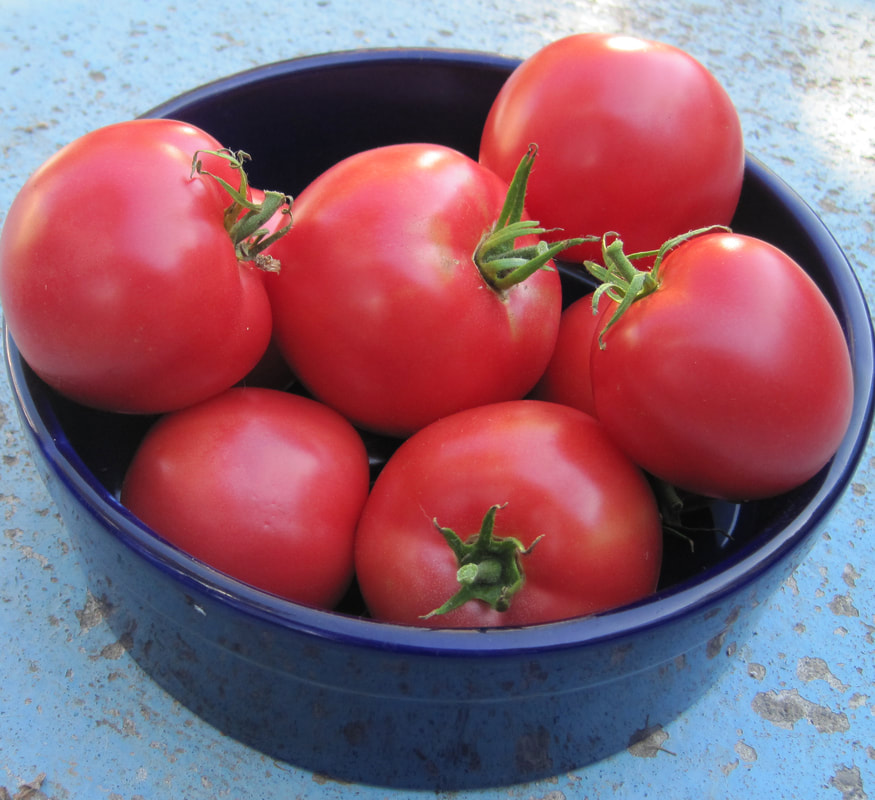
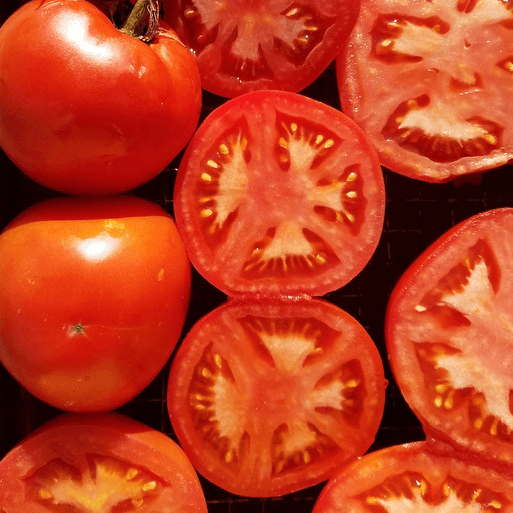
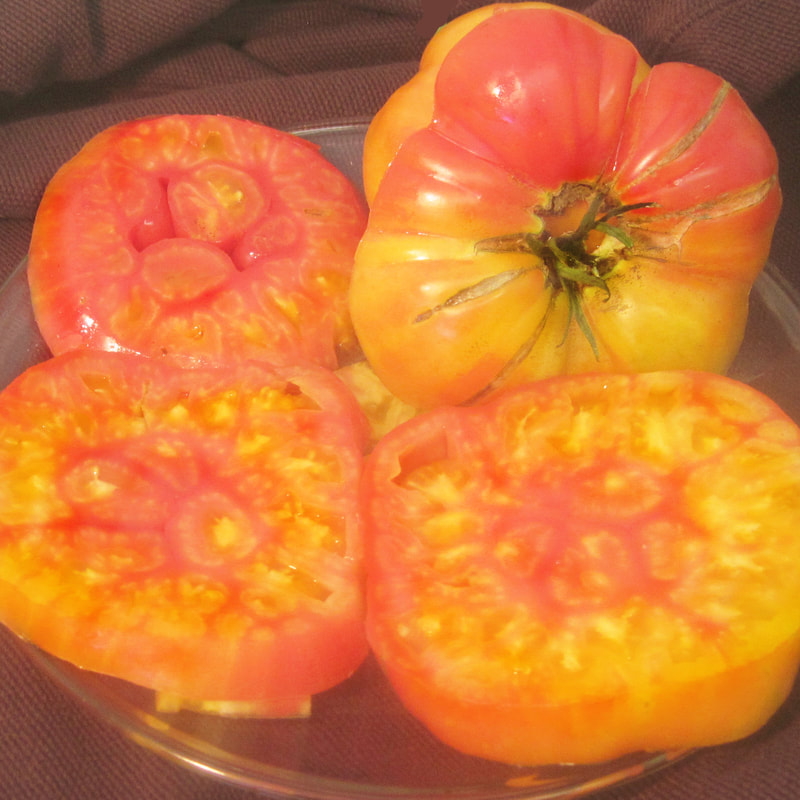
Every tomato description will mention whether it's determinate, or indeterminate. By nature, tomato plants are branching vines that continue to grow and make fruit as long as the weather is above freezing. That natural tomato habit is called indeterminate--there is no set (determined) limit to the plant's life or size. Determinate tomatoes do have a limit. They have been selected for a mutation that limits them to a shorter size, sometimes called a "bush" tomato. Most full determinates have also been selected to make all of their fruit at once, then quit. That is useful if you want a single, big harvest to sell, freeze, or can. This usually comes at some cost in flavor, and most of these tomatoes also have firm flesh and tough skins to help them survive shipping in good shape. Semi-determinate plants stay short and manageable, but do not set all their fruit and then die. They continue to make fruit until frost. Some older market varieties, a few old heirlooms, and the dwarf tomatoes all have this short-vine habit. There are several terms for the size and shape of the fruit. Cherries we all know. Saladette is the next size up--about 2" across. These are the ones usually quartered or sliced for salad. Inside, they are juicy, with a firm center. Most of the early and extra-early tomatoes are this size. Saladettes are available in many shapes, colors, and flavors, and usually have a very high proportion of unblemished fruit. The photo above left shows a pink saladette type. Large, full-size tomatoes can be divided into juicy types and true slicer types. Heirlooms and varieties with outstanding flavor can be of either type. The "juicy" types look somewhat like a wheel when sliced; they have spokes of firm flesh with large "locules" in between that are full of juice. (This is also where the seeds are located.) These are great for salad or slicing, but can be too juicy for a sandwich or if you want the slices to hold together. Saladettes and many large tomatoes have this structure. The center photo by Karen Morton clearly shows the spokes of firm flesh and the locules full of juice. Most modern market tomatoes are of this type, because they last longer without bruising, splitting, or rotting in transit. True slicers have a different structure. They are just as juicy as "juicy" types, but the juice is more contained, in very small locules scattered all across the surface of the slice, instead of in 4 to 6 big locules. The flesh is tender and has a silky texture. So you have a meaty but tender slice dotted with small flecks and pockets of juice/seeds which are less likely to fall out or drip. Many of the most famous heirlooms and taste-test winners are of this type. They do not ship well because their flesh and skin are more tender than other types. The Pineapple tomato shown at right has the meaty texture and intricate structure of the slicer types, with dozens of tiny juice pockets throughout its yellow and red bicolor flesh. Brandywine is another of this type. I've read over and over that paste tomatoes are drier and less juicy than all of the above types, but experience doesn't bear this out. It is certainly true of modern processing paste tomatoes like Roma. Heirloom paste types actually vary quite a bit in juiciness, but they do share other traits that make them better for cooking and sauce. The most important is that they peel easily. Modern processing tomatoes are peeled by machines or chemicals, but heirlooms were selected for hand peeling, and they all peel very easily. Usually, they also leave their calyx and stem behind when picked, saving labor in de-stemming. Another important trait for traditional sauce or paste tomatoes is that they melt into a smooth, creamy sauce without a blender or food processor, instead of separating into very firm flesh and very watery juice. A typical sauce tomato would be Italian Heirloom. It peels easily, and as soon as you lay pieces into a hot pan, it melts into a sauce with good body, creamy mouthfeel, and smooth texture. It will still need to be simmered to evaporate the juice and thicken the sauce, but it will be a sauce, not chunks of tomato. Most heirloom slicers like Brandywine and Cherokee Purple have this trait as well--they make excellent quick fresh pasta sauces. Tomatoes with this trait tend to have a "silky" mouthfeel. A typical canning tomato would be Gill's All-Purpose. It holds its shape even under high heat. When you open the jar, you can take out whole tomatoes surrounded in almost-clear juice. This is a prized trait if you want whole tomatoes for the freezer or in jars for the winter. It will also stay chunky and firm if diced for pico de gallo salsa. Drying tomatoes are a special type that is usually pretty tasteless fresh, and has little juice. In Italy, these were dried on the roof of the house, or in a sunny courtyard. If you have a dehydrator, almost any tomato can be dried. One strategy is to use slicers. Another is to use juicy types, and let the juice drain out in a bowl or colander before putting on the drying tray. Another is to use cherry tomatoes, just cutting them in half. I prefer to use paste tomatoes, cut in lengthwise slices. But I don't do much drying--I'd rather have jars of salsa and boxes of frozen pasta sauce. It all comes back to what you will actually use. Ready to look at some tomatoes? Here they are.
1 Comment
Plants have the same big challenge in summer that humans do: staying hydrated. We all know what a wilted plant looks like, but chronic, lower-lever drought stress is less obvious. There is a progression of symptoms, as the plant tries to keep all of its leaves hydrated, fails, and sacrifices less important leaves so that new ones can grow. At this level of drought, the plants survive, but harvests are smaller because the plant has so little to spare. 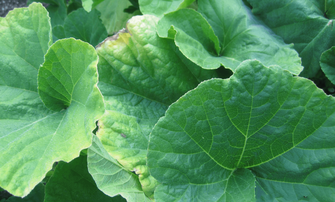 These are the steps in drought stress:
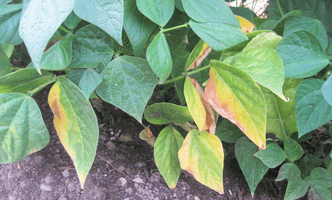 If you are focused on soil nutrients, you might think your plants have a potassium deficiency. That's a reasonable guess, but backward: Potassium deficiency mimics drought stress because potassium is involved in moving water inside the plant. A plant low in potassium overheats and dehydrates. When you see the above symptoms, it's a good idea to try more water first. If you are sure your soil has been damp enough, or you see no response after a week, try supplemental potassium. (Note that leaves with severe damage won't recover. Watch the less-affected leaves and the plant's overall growth and color.)
While drought stress definitely means the plant is not getting enough water, there could be several reasons why the plant is thirsty. There are other solutions than pouring on more water. Common garden mistakes can create drought. I found many such mistakes in my own garden. Mistake 1: I didn't start the year with enough organic matter in some of my beds. Moisture can sit between the mineral particles (sand or clay) in soil. But only organic particles—humus, compost, pieces of dead plants—can soak up water inside and hold it ready for roots to use. Obviously, you can't dig up your plants to amend the soil now, but you can add compost on top. Earthworms, water, and gravity will help put it underground—and organic compounds like humic acid will dissolve and get to plant roots. Mistake 2: I didn't put down mulch soon enough. Organic mulches like straw, leaves, or wood chips add organic matter as they decompose. Mulches with thermal mass, like stones, condense water out of moist night-time air. Either kind of mulch prevents the soil surface from drying out and allows more biological activity in the top inch of soil, where air, moisture, and soil microorganisms meet. I am already seeing the good effects of some mulch I put down earlier this week. Mistake 3: It's easy to have too many straws sipping out of the same cup. There's only so much water in each cubic foot of soil. If one plant occupies that foot, it gets all the moisture. If there are ten plants, they have to share ten ways. It doesn't matter if they're crops or weeds, they're all competitors. So when I didn't thin my beans, I set them up for dehydration. Give your plants the recommended spacings, or more if water is short. It is better to have 5 productive plants than 10 barely surviving, so thin now if needed, even if it means taking out mature plants. Mistake 4: We all know that things dry quickly if we direct a fan at them. That applies outdoors as well—moving air sucks the moisture out of things, including live plants. We expanded our garden this year by taking out a fence. Without the fence, there is more wind, and things dry out. It is worth setting up temporary barriers if wind is affecting your plants. Mistake 5: more sun than plants can handle. Creating shade can help keep the soil moist, and keep plants from overheating. Above about 90 degrees, most crop plants go into shock. Sometimes they just can't keep themselves hydrated even if water is there. Shade cloth, wooden lath, or temporary reed fencing can keep plants growing actively instead of shutting down. One index of heat stress is blossom drop in tomatoes and peppers. Others are toughness, bitterness, and tip burn in leaf crops. Looking ahead: It is time to start fall crops, but keeping young seedlings alive and growing in hot weather can be challenging. Pots overheat in direct sun and dry out quickly. But direct-sowing is problematic too. It is often easier to monitor, protect, and water a few flats than a whole garden bed. A porch with morning sun only is ideal for seed-starting in hot climates. Or consider making a simple shade house with shade cloth, branches, or fabric. Or create a nursery bed in the garden with dappled shade, either natural or created with shade cloth. A place with bright indirect light or dappled shade, sheltered from wind and hot sun is a good place for spouting seeds, no matter how you attain it. 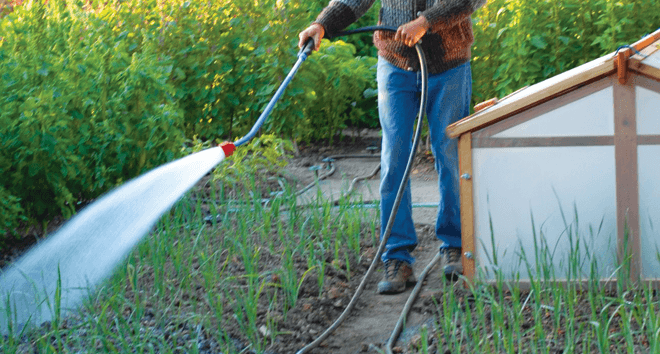 Watering is one of those contentious subjects, with vociferous champions for different watering times and methods. My own approach is to look at the other functions of watering besides just keeping plants alive. One major thing water does is to cool the soil by evaporation. So, I water at times when cooling is a good thing. In spring, when nights are still cold, I water early in the day. That gives the soil all day to warm in the sun, and start the night with as much stored heat as possible. Later, when the days get hot, we switch to late afternoon, giving the plants the water they need to grow during the night when they are not heat-stressed. If the weather is brutally hot, I water a bit during the hottest part of the day. This is just what “experts” tell us not to do, because the water will evaporate before the roots can use it. What they don't say is that by evaporating, it forms as little pocket of cooler, moister air to refresh the plants. When temperatures exceed 90 degrees, plants often shut down and cease growing; this little bit of evaporation can make the difference between growing and just surviving. It also cools and moistens the feeder roots, bacteria, fungi, and other organisms in the top inch of soil. Normal deeper irrigation can proceed at the normal time. In early August, we switch again. The danger of mildew during the long warm nights of August and September is great. Mildew grows best in warm, humid air. So we water in the morning again, and let the plants go into evening with the soil surface dry. Unintended functions of watering can be soil compaction and foliar disease. So we mulch well. Soil that splashes up from the ground from raindrops or watering is a major cause of foliar diseases like rust and wilt. Straw mulch breaks the impact, preventing soil compaction as well as the splashback that causes disease. Another function of watering is to enhance the soil food web. When the interface between soil and mulch is slightly damp, fertility-producing microorganisms thrive. Microorganisms need oxygen, water, and food. Mulch and water put food and moisture within the critical top inch of soil, where oxygen is abundant. The entire root zone needs water, so be sure that whatever method you use, it reaches the whole bed. Soil Texture Affects Watering Time and StyleClay soils that are heavy and sticky drain very slowly. They take a long time to get fully wet, and a long time to dry afterward. They need long, slow watering at wide intervals. Water spreads more than it sinks. Drip emitters can be far apart, with slow flow rates and a long watering period. Sandy or silty soils wet or dry quickly. They need short, frequent irrigation. The "deep, infrequent watering" that books recommend won't work here--the water just drains away below the root zone, and plants dry out. Water in sandy soil goes almost straight down, so emitters in drip systems need to be close, with faster flow rates and short, frequent, watering periods. Organic matter can hold water within the particles, not just between them. This means it can drain well while retaining water, spongelike. Wise gardeners add it to their soil in the form of compost or mulch. Loamy soils naturally have a good proportion of organic matter. Water spreads about as much as it sinks, in an upside-down cone shape underground. Drip emitters can be at medium spacing, with medium flow rates and watering periods. Because of the ability to retain water, the watering periods can be less frequent. Choosing a Watering MethodIf you are a new gardener or have a small garden, the daily interaction from hand-watering your plants is very helpful in keeping tabs on them, so problems are noticed early. However, a larger garden and busy schedules make some form of mechanical irrigation attractive. What kind you need depends on your soil, what you are growing, your climate, and your preferences.
Hand watering is best done with a wand that breaks the flow of water into fine droplets that don't pound or wash away soil. Water the soil, not the plant itself. And remember that the root zone is probably about twice the width of the plant. The photo at top shows the best way to hand water: Do you notice the wand is turned up so that the water loses velocity going upward? Then it falls gently. You should plan on hand-watering sometimes, no mater what other set-up you have. Newly planted seeds and new transplants will need extra watering because they don't have big root systems yet. Your mechanical systems should be set up for average summer weather. Plan on adding an extra watering cycle in very hot or windy weather, or spot watering by hand as needed. (Photo by Cynthia Raiser Jeavons.) Overhead sprinklers use the most water and wet the foliage. Rinsing the leaves can be a good thing, and in high heat, overhead water may rescue plants by reducing water loss from leaves, and cooling the area. However, having to wet the leaves every time you water the roots can be problematic. There is no point watering the paths between permanent wide beds, so sprinklers are wasteful there. If you plow or till your whole area and then plant in rows, the area between rows may be part of the root zone, so overhead watering makes more sense. However, it also leads to lusty weed growth, and sometimes foliar disease, even if you can afford the amount of water involved. I suggest wider spacings if you use overhead watering, to make sure of good air circulation, which helps prevent disease. Drip irrigation takes many forms and can be tailored to many situations; it has advanced considerably in the last 20 years. It's strength is that it is focused just where you want. Be careful, however, that you don't limit your plants root growth with too narrow an area of moist soil. A simple system for vegetable beds could use tubing with built-in emitters that deliver water at a consistent and reliable rate every foot or so. You have only to lay the tubing in the bed and plant around it. Emitters that are mini-sprinklers are also available, for a wider reach. Landscaping is probably the easiest to put on drip, because you don't have to disturb it for yearly planting. Use permanent tubing to carry the water and add emitters or leaky hose to supply trees, shrubs, and perennials. It is worthwhile buying from a specialist, and following their recommendations. Dripworks has excellent resources for figuring out what you need. (I have no financial or other interest in them; they were pioneers in the field.) You are watering too much if the soil is squishy, sticky, or very soft. You may also see plants turn up the leaf edges to try and get rid of some water out of their stomata (leaf pores). You may see leaves get a hunched appearance: it means water is taking up all the air spaces and depriving roots of oxygen. This leads to root rot. In the worst case, crown rot will kill the plant. The rot kills the water-carrying tubes just under the bark. The plant is girdled and dies. How do you know whether you have watered enough? At first, when you are planting seeds, there is no substitute for digging to see how far the water penetrated. It is also good to dig a hole and see how fast it drains. Later, watch your plants, and even weeds, to see if growth is normal. Often, people think they need to fertilize when really they just need to water a bit more, or to hold the water in the soil longer with mulch. Observation, as always, leads to familiarity with the signs and symptoms. A "green thumb" is really a watchful and thoughtful interest in the day-to-day life of the plants in your charge. 1) Plan for your space.
Whether you use graph paper, a computer, or the back of an envelope, what goes where is the perennial problem. Plants will affect and shade each other: Lettuce likes to be on the east side of something tall, so it gets morning sun but afternoon shade. Peppers like hot sun overhead but some shade on the sides to avoid sunscald. (We like to surround them with basil.) Onions can't stand any shading--they want sun on the shoulders of the bulbs to ripen them. There are trade-offs to make--Do I want a whole winter's worth of squash and dry beans to store, or fresh sweet corn every day in August?? 2) Plan how far ahead to sow indoors. If you sow squash indoors at the same time that you sow tomatoes and peppers, you will have pot-bound, sickly squash plants at planting time. You will need to start seeds in waves: Tomatoes and peppers 4-8 weeks before last frost, squash and melons 2-4 weeks. Find your last frost date HERE 3) Plan for harvest all season and all year. There's nothing worse that getting to the height of summer and finding that your sweet corn is already gone, your lettuce has bolted, and your green beans are petering out. Crops that have a short harvest window like corn and bush beans should be sown every two weeks, a few at a time, if you want a continuous supply. Leave space for planting later varieties. Once the original plants have petered out, it is too late for new sowings to mature. And weeds will just fill the space if you harvest without replanting something. Even tomatoes need a later wave of plants if you use determinate types. Account It's helpful to divide the year into 5 seasons or slots: early spring, late spring, summer, fall, and winter. You can figure that most crops will use their space for two of the five time seasons or time slots. (salad greens excepted.) For example, peas, broccoli, and lettuce could be sown in bed A in early spring. They won't all be finished in late spring, when it's time to plant summer tomatoes and beans--those will need to go in bed B. In summer, the peas in Bed A will be done--just in time for sowing with kale and cabbage. Those will stand through winter. The tomatoes in bed B will also use 2-3 slots, going through summer to fall, and giving way to a cover crop of rye and vetch that will be in place for two more slots--fall and winter. 4) Plan for fresh eating and for preserving. It's easy to overplant things that have to be eaten fresh, like zucchini. Remember to allot more space for easily-stored crops like winter squash, flour corn, or dry beans than for things you will only use fresh. If you're canning tomatoes, freezing green beans, drying zucchini, or making sauerkraut, you will need more space for those crops than if you were just using tomatoes, zucchini, green beans, and cabbage fresh. You may want to choose a special variety, too. I use paste tomatoes for salsa and canning, so I plant a lot of those, and a smaller number of favorites for fresh eating. Pole beans give a bigger total harvest over the course of the summer, but if you want to also can or freeze green beans, you might plant a bush variety that will give you a lot at once to get the job over with. 5) Plan to prevent disease. It can be hard to stop putting spinach in that perfect spot by the path and tomatoes in back where they make a screen. But once you get spinach wilt in your soil, it takes 7-10 years for the soil to cleanse itself. Different organisms target tomatoes. So switch them. Often home gardeners don't recognize a specific disease--they just notice their garden is no longer so productive. It's really important to rotate the plant families from year to year. Here is a guide to plant families and how to rotate them. 6) Plan for fertility. Legumes pull nitrogen from the air into the soil, so they are often grown either along with a heavy feeder or immediately after. Grains make lots of carbon in their stalks and leaves, giving you more and better compost. And cover crops benefit the soil in more ways than we can list here. They are important enough that it is worth figuring out ways to work them into your garden year. For summer cover crops, a good rule of thumb is to plant buckwheat whenever you have an open spot for a few weeks. 7) Plan for seed saving. We are often contacted in the fall by customers who want to know how to save seed. We often have to tell them that they are not going to have usable seed--they didn't plan for needed isolation. So, if you have favorites you'd like to save, now's the time to plan. Is it a variety that will cross or is it self-fertile? Do you have more than one variety of that species? Do you have enough distance between them? Can you separate varieties by sowing time instead of distance? Can you plant early enough for the seed to fully mature? Many flowers and herbs are easy. Tomatoes, peppers, lettuce, beans, and peas are very do-able at home. Squash, the cabbage family, spinach, amaranth, and pumpkins may need special measures. It also depends on your site and climate. Luckily, there are excellent and very readable books. I recommend The Seed Garden by Michaela Colley and Jared Zystro, or Seed to Seed by Suzanne Ashworth. You can download good information here: https://seedalliance.org/all-publications/?fwp_publication_category=how-to-guides 8) Plan for your climate--and some surprises. Gardeners often love a challenge, but for reliable crops, plant varieties that are adapted to your climate. In short-season areas, choose early types. In hot, wet places, disease-resistance is a priority. Climate will also affect spacing--very wet areas may need wider plant spacing so air can circulate. In hot-summer areas, most leaf crops will appreciate shade in the afternoon. Put them on the east side of a house, a tall row of corn, or a tree, where they will get morning sun and afternoon shade. Once you have settled on the varieties you want, include some fall-backs in case the season is hotter or colder than you expect. I can nearly always ripen the big luscious heirloom tomatoes. But I always plant a super-cold-hardy type like "Stupice" just in case. If you have cabbage, carrots, and chard as well as tomatoes and corn, you will still have something from the garden if the summer is cold.  Most domesticated vegetables and grains sprout when and where they are planted. They no longer go dormant (literally meaning "sleep") because the gardener is going to take care of them. Perennials, berries, trees, and many herbs are closer to the wild, and still go into dormancy to help them survive. There's a page of seeds needing stratification here.
Seeds go dormant in nature to wait until conditions are right for survival. To break their dormancy (wake them up), the gardener needs to create the conditions the seeds are waiting for. There are three tricks gardeners use to break dormancy and get seeds to sprout: Stratification, Scarification, and Soaking. Cold Stratification: Many trees, shrubs, and many perennials from temperate climates like to go through the winter as seeds. Herbs like Valerian, Lavender, Nettle, and Echinacea behave this way. So do the wilder perennial vegetables like Caucasus Mtn Spinach, Lovage, and Good King Henry. In nature, they drop from the plant, spend the winter in cold wet soil, and sprout in spring. This is an adaptation to temperate winters--it keeps the plant from having to face freezing temperatures as a small seedling. The process is called cold-conditioning or stratification. You need to give the seeds enough cold time to meet their chill requirement--which is given on the packet and the website for each variety. If you plant in pots in the fall and leave them outdoors, they will sprout when the weather warms. If you want to plant in summer, you can use the refrigerator to provide the cold. (Place the seeds in a bit of moist potting soil in a jar before refrigerating, then plant as normal at the end of the stratification period.) You can see many seeds that need stratification here. Each plant has a specific length of time that it needs for this cold, moist period--this prevents them from sprouting during unseasonable thaws. So, for example, Rowan, or Mountain Ash, which naturally grows around the world in northern regions, needs 90 to 120 days of cold before sprouting. Red Root, from Mediterranean climates in the western US, needs only 30 to 90 days of cold. And Moringa, from the tropics, needs none. It doesn't even like to be stored in a refrigerator, because it needs warmth to stay alive. Scarification: There is another process that you may see mentioned on seed packets and in books. It is called scarification, and it is another way of breaking dormancy. Cold is not the only danger to young seedlings--in many places, water is the limiting factor. A plant that sprouts before there is a good supply of water is condemned to shrivel and die. So, plants from places with a pronounced dry season have very hard seed coats that prevent water from entering the seed and initiating germination. These seeds need to have their tough seed coat scratched so that water can enter before they can sprout. In nature, flash floods or raging rivers tumble the seeds along with rocks and sand, which scratch the coating and start germination. That way, a tiny bit of rain or dew won't fool the seed into sprouting before there is enough water for growth. Licorice and Astragalus are both river bank-adapted herbs that need to be scarified. You can scarify seeds easily at home with a piece of fine sandpaper. Just cut the sandpaper in half, put a few seeds on the paper, and put the other half on top. Rub them lightly together 3 or 4 times. Then try soaking the seeds. If they swell up within a couple of hours, they are adequately scarified. If not, try again. If the seeds are cracked or broken, use less pressure or fewer scratches next time. Usually one or two tries will find the happy medium. Soaking: Plants that don't encounter turbulent storm waters have another way of preventing premature germination. Instead of a tough seedcoat they have a coating of natural chemicals that prevent germination. Many dryland wildflowers, such as lupines, have this strategy. Garden plants that have germination inhibitors are carrots, parsley, fennel, beets, and especially parsnips. These seeds all need a good soaking to remove the germination inhibiting compounds. For example, carrots and parsnips often take two weeks to sprout in the garden, and need to remain moist the entire time. However, if they are soaked for 8 hours and rinsed well in a strainer, you can plant them and get little seedlings in a few days. The soaking removes the inhibitors that otherwise would dissolve very gradually in the moist soil. Be aware: most vegetable seeds do not have these germination-inhibiting chemicals and should not be soaked for long periods. (They will rot.) Peas, beans, and spinach can be soaked, but only long enough to soften the seed coat--usually 1 or 2 hours is plenty. Most other vegetable seeds need no soaking at all. Many gardeners assume that fall crops will be a repeat of spring--peas, lettuce, and so on. But some plants are easier and more productive in the fall. They tend to bolt when spring-planted. They can be grown to perfection in the fall. You can sow them in pots, which is nice because you can give them some shade if needed while young, and transplant as space opens up. OR you can sow them in place if you don't want to fuss over pots. If you do direct-sow into the garden, be sure to water often while they are getting established, and to thin the plants to optimum spacing. (I speak from experience. Reluctant to destroy my baby plants, I once left a bed of cabbage at too-close spacing. That bed produced not a single edible head. Actually, that has happened more than I'd like to admit.) Fall Crops need less care in most climates; weeding, watering, and harvest chores are all minimal. There is no single big harvest glut to be processed or stored. Just harvest a leaf, cut a head or pull a root as needed. If your winters are very rainy, I recommend a wider spacing than usual, for air circulation and to give slugs fewer places to hide. Mulch is a good idea to keep soil from splashing up on the plants and to stabilize temperature extremes. Potassium helps keep plants hardy and disease-resistant, so a sprinkle of wood ash or seaweed is a good practice. Remember that the winter harvest is long. While summer crops reach the table for only 3 months or so before the season is over, winter veggies will be producing from now until next summer. So any time and effort you invest is really worth it. Here are some options you may not have considered: 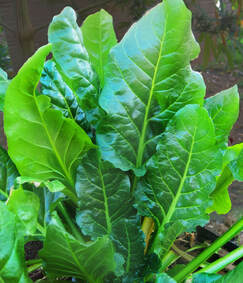 Spinach reaches its greatest size and juiciness in winter. The danger of bolting in the heat is gone, and the flavor remains mild. You can harvest leaves over and over rather than racing to get one harvest before hot weather. Even easier and much longer-lasting is Chard, a spinach relative. Most Chard has a strong flavor, but Perpetual Spinach (shown left) is a different type of chard that remains mild and tender like its namesake. 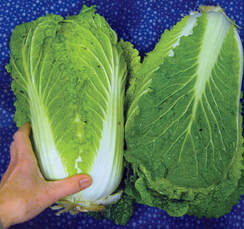 Chinese Cabbage or Nappa is challenging in spring but really easy in the fall. It makes a head very quickly for fall eating. It is the most juicy and mild-flavored brassica of all, perfect for salad. It's also easy to grow a big crop to preserve as kim-chee or sauerkraut. 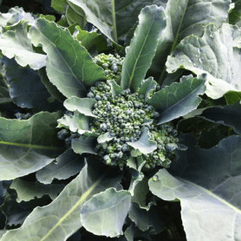 The workhorse brassicas of winter are broccoli, cabbage, and kale. They will grow faster now in summer-warmed soil than in spring. Solstice is a great winter broccoli, bred to hold its heads up out of the foliage. This not only makes harvest easy, it keeps the heads safe from slugs and mold. You will want a few kinds. Lacinato (dinosaur) kale is a favorite for all kinds of winter meals; it is hardy to zone 6. Siber Frill is great for salad as well as cooking, with its fine-cut, curly leaves that hold dressing perfectly. It is hardy to zone 5. White Russian is hardiest of all, to zone 4, with terrific flavor. It's also most resistant to wet. We use it in stews, pasta, and soups all winter. 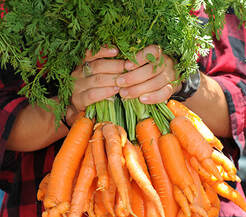 Speaking of stew, let's think about winter comfort food. Other vegetables have the glamour, but roots deliver solid comfort-food sweetness and substance. The hands- down favorite vegetable with all the kids in our family is roasted root medley. Oiled and roasted in the oven, those carrots, parsnips, rutabagas, onions, and beets get sweet and toasty, with a bit of crunch outside and a smooth starchy interior like a good french fry. The kids would never guess it's good for them! They say the adults can have the tomatoes, if they can have roasted roots. 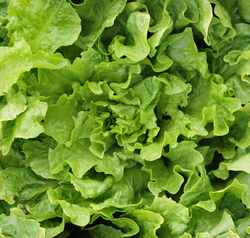 Another family of plants that prefer fall are the chicory/endive gang. Unlike lettuce (which likes to sprout in cool soil but is not cold-hardy as a mature plant), endives are hardy plants that make great winter salads. They are also substantial enough for cooking. Braised escarole and endive are Italian favorites. Raddichio and Frisee are perhaps the most familiar. If you are new to this family of greens, with its succulent mixture of sweet and bitter flavors, try Sugarloaf Chicory, which is like a big glossy romaine in shape and color. 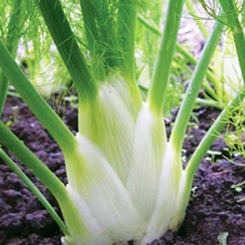 A unique flavor of fall is fennel. This is the secret to authentic and savory pasta sauces. Fresh, it has the the crunch of celery, with a milder, sweeter, slightly licorice-scented flavor. I love it as a crunchy winter salad in a lemony dressing, or used as a dipper with blue cheese. Cooked, it is sweet and rich, perfect braised with meats or adding body to a stew. The white bulb is used both raw and cooked. The green stems are used chopped in pasta and stew. 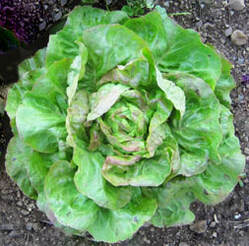 Even though lettuce normally likes to grow in spring, gardeners over the past couple of centuries have managed to breed a few that are adapted to growing as fall and winter crops. Hungarian Winter, Quan Yin, and Bronze Arrow are some of these. They are both cold-hardy and mold-resistant, for growing in rainy or hoophouse conditions. If you live in zones 7 or 8--or have a cold frame or greenhouse--sow lettuce and other salad greens every couple of weeks . Not only does this give you a steadier supply, but the young lettuce plants are more hardy than mature ones. (Lettuce is still the least frost-resistant vegetable on this list.) 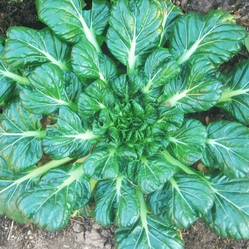 The easiest options for winter salads are hardy, mild-tasting Asian greens like mizuna or tatsoi. You've eaten these if you've ever gotten "spring mix" at a store or restaurant. (That's tatsoi at left.) Hardiest of all are mache, miner's lettuce and erba stella. They will sprout and grow any time the ground is not frozen. All of these choices make great, cold-hardy salad greens.
 Cover crops are a confusing topic for most gardeners, and no wonder. Most books expect you to plow them under. To gardeners, that doesn't sound doable. But new research shows that soil-building comes easier than that: from roots. Of course, the top growth is important; preventing weeds alone is a huge benefit. And preventing soil loss. But out of sight, the roots do much more. Like opening passages for oxygen, feeding earthworms--and dying. When the tops are cut, the roots die and turn to compost right there in the soil. Compost that you don't have to haul, turn, or shovel. And we aren't talking small amounts here. Winter Rye makes 380 miles of roots per plant. The most fertile soils in the world are grasslands, where the roots grow and die in the soil year after year. Turns out that the buffalo enriched the soil in an unexpected way-- "pulse grazing." They chewed the tops off, and the roots died back. The animals migrated away, the tops grew back, and the cycle repeated. In your garden, you are the buffalo! What to Plant? Let Nature be your guide. Meadows and prairies have a mixture of grasses, legumes, flowers, and taprooted plants. The famously fertile topsoils of the Midwest were built by such plant communities. Use that soil-building synergy in your garden. Your mix should include:
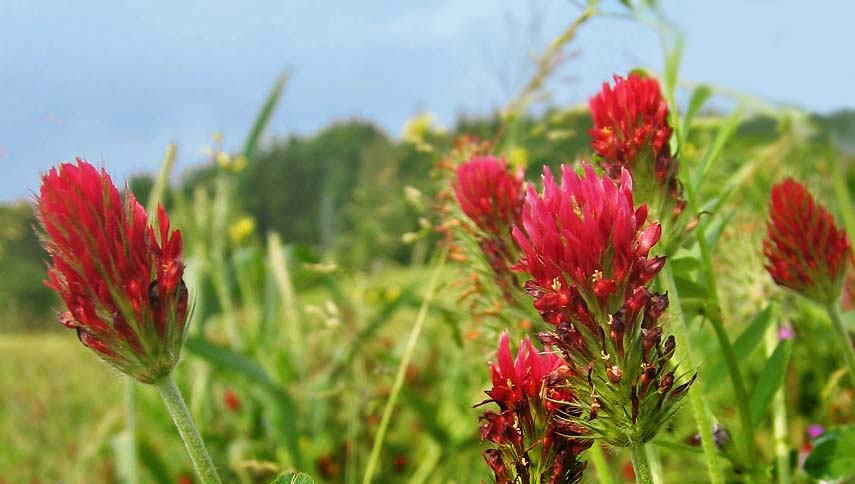
https://www.quailseeds.com/store/c49/Fertility-Building_Cover_Crops.html Of course, you don't have to plant a mix. If you want a cover crop that gives you a food crop as well, plant winter grains. Wheat is a classic rotation in traditional food systems all over the world. Modern wheats, and modern farming techniques (and chemicals!) are making people sick, but heritage wheats are a healthy food you can grow for yourself. See the choices HERE. Timing is important The size of the root system depends on when you plant. It's best to sow cover crops 2-4 weeks before your first fall frost. * Don't be surprised if the plants don't get tall--they will be busy underground. In tests, crimson clover that was was only 2 inches tall by November nevertheless had roots 12 inches deep, with many nitrogen nodules already fertilizing the soil. Rye only 6 inches tall had roots 20 inches deep. All winter, the roots will be holding your soil, providing channels for water absorption, and adding tons of organic matter to your garden. But how can you plant cover crops when the beds are still full of summer plants? Here are some options:
Don't forget pots and containers. A low-growing, cover crop prevents your expensive soil mix from getting washed away or taken over by weeds. Calendula, poppies, salad greens, clover, and peas are great for this. If you aren't using the pot, cover it with its saucer to keep weeds out. See the possibilities for cover crops here: https://www.quailseeds.com/store/c49/Fertility-Building_Cover_Crops.html *You can find first and last frost dates online. Here is one place: https://www.almanac.com/gardening/frostdates Compost Tea is gaining popularity not only as fertilizer for the soil, but as a spray to invigorate the plant's defenses against pests and disease. You can make compost tea from finished good-quality compost. Or you can make the tea using worm castings. I like to use worm castings. (I'm mostly composting chicken bedding, which I would not want to spray onto the plants.) Many people make teas from compost or manure by just soaking, without aeration. If you elect to do that, be aware that it will be very smelly if you leave it very long, because the anaerobic bacteria (those that can live without oxygen) cause wet organic matter to rot and stink. The bubbler puts oxygen into the brew, and the aerobic, oxygen-loving bacteria have a pleasant, slightly beery smell. Aeration will also put more nutrients into the brew. WORM CASTING (OR COMPOST) TEA To make this tea, you need an aquarium bubbler, which consists of an electric compressor pump, some tubing, and an air stone. Alternatively, you can agitate the brew to keep it oxygenated. You would need to stir it vigorously 2 to 4 times a day. Smaller batches may be shaken vigorously in a jar. A compromise between buying an aquarium bubbler and using just hand stirring would be to use an electric mixer a couple of times a day. Combine in a five-gallon bucket:
Mix everything together and stir well. Turn on the bubbler, with the airstone down on the bottom of the bucket. Let it bubble for 36 hours. In cold weather (below 60) it will take twice as long. In very hot weather (above 80), one day will suffice. It's then ready for use. If you do not use it right away, keep bubbling it. Do not keep more than 5 days. Use it to water your plants, either straight or diluted half and half with water. Use it diluted half and half as a foliar spray. Korean Natural Farming is a style of organic gardening that uses microbial cultures to make the garden healthy and strong. KNF teaches ways to grow your own fertilizers, pest controls, and plant supplements using the free microorganisms native to your area. All of the preparations are simple, cheap, and need no equipment. Here are the two easiest to make. We use them all season, from greenhouse to harvest. We also use LAB to keep our chicken coop sweet-smelling and fresh.
LAB The easiest KNF brew to make is the Lactic Acid Bacteria (LAB), which is basically what is in yogurt and sauerkraut. It is also a good one to know because is supplies different kinds of microorganisms than compost tea does. They make a great pair, either to use on different days or to mix immediately before using. The University of Hawaii has done a lot of research on Natural Farming ferments. Here's a link to their pdf on Lactic Acid Bacteria brew. https://www.ctahr.hawaii.edu/oc/freepubs/pdf/SA-8.pdf FPJ Fermented plant juice (FPJ) is a growth enhancer. It uses fresh, actively growing plants from your own area and concentrates them. So you get the nutrients and hormones that produce strong plants in your conditions. We usually use weeds for this, as they are so vigorous and well-adapted. Again, the University of Hawaii has a pdf with the recipe and uses. www.ctahr.hawaii.edu/oc/freepubs/pdf/SA-7.pdf Garden vegetables belong to families of related plants. These families tend to share pests and diseases.
You don't want last year's pests lying in wait for the new seedlings, or diseases in the soil around your seeds. Moving each crop family to a new spot from last year helps give them a good start. For best insurance against bad diseases like soil-borne wilt, allow 4 years before the same family returns to the same place. Pests and disease spores overwinter in the soil and on crop residues. You can address soil-borne problems with rotation. Get rid of diseases or pests lodged in crop stems, leaves, and other residue by hot-composting all crop residues if the fall. Making it Work If you have a number of similar-size beds, rotation is easy. Just divide the crops up into beds, and then always move things one bed over each year. You can use this system to help with the fertility needs as well: lots of manure or compost and lime on the beds with heavy feeders this year, and the next year a light feeder like carrots can move into that space with no additional amendment. A time-honored system for a single garden space is to divide it into 4 or 5 roughly equal areas, and rotate each family (or group of families) into a different one every year until at last they get back to where they started. You would need to group families that don't take up much space, or that you don't grow much of, together. A family like tomatoes/potatoes/peppers, would fill an area on their own. Area 2 might be squashes, corn, and perhaps beans (the "three sisters") Area 3 might be onions and brassicas, which both like lime and nitrogen. I put these in one area for spring and a different area for fall. That would leave a final area for everything else--lettuce, spinach, carrots, beets, chard, okra, etc. If you like to grow lots of corn, or lots of winter squash for storage, each of those might fill an entire area. Some plants have worse potential for disease; those are the ones you should make sure to rotate. If you get onion thrips, for example, be sure that the onions move in a group and don't return until year 3 or 4. Other plants that have fewer problems in your area might fill in wherever there is space. Generally speaking, brassicas (cabbage family) have more possible diseases and pests than other families, so in most parts of the country you'd do well to rotate them. The other extreme is to use polycultures of many types of plants mixed together in each bed, and trust that the mixture will deter pests. My own system is to rotate the families with major pest or disease potential here--the tomato, squash, spinach, and cabbage groups. I scatter the rest where space allows, using a lot of companion plants like flowers and herbs. Here is a gardener's list of families: PARSLEY FAMILY (Umbellifers): carrots, dill, fennel, parsley, parsnips, cilantro, caraway, celery, ASTER FAMILY (Composites): lettuce, chicory, sunflowers, artichokes, cardoon, endive CABBAGE FAMILY (Brassicas): broccoli, cabbage, cauliflower, mustard, Asian greens, Brussels sprouts, Turnips, radishes, cress. TOMATO FAMILY (nightshades): tomatoes, potatoes, peppers, eggplants, tobacco, petunias SQUASH FAMILY (cucurbits): winter and summer squash, cucumbers, melons, watermelon BEAN FAMILY (Legumes): peas, beans, cowpeas, vetch, favas, soybeans, astragalus, sweetpeas SPINACH FAMILY (goosefoot or chenopods): spinach, chard, beet, quinoa HIBISCUS FAMILY (mallows): Okra, hollyhocks, marshmallow, hibiscus, jamaica, Egyptian spinach GRASS FAMILY Corn, wheat, rye, bamboo, barley, rice, sorghum, millet, teff ONION FAMILY onions, leeks, lilies, chives
TRADITIONAL PLANT BREEDING starts by pollinating the flower of a plant with pollen from a related, but slightly different, variety. New varieties can also start from noticing superior plants from natural variation or from natural mutations. Then, over several generations, the plants are selected for desired traits. In this way, broccoli, for example, became different from the tough, bitter wild plants that are its ancestors. OPEN-POLLINATED: As people keep selecting their best plants for seed, the results gradually become more predictable. Eventually every time you plant that kind of seed, the plants give similar results. Then the seed has been stabilized as an open-pollinated variety. The animal equivalent would be beagles, or golden retrievers—you know what to expect in looks and, to some extent, behavior, because they are purebred. Individuals have slight variations within the “family resemblance”. HEIRLOOM SEEDS are open-pollinated varieties that have been around a long time (50 years minimum). Older varieties are often more nutritious and more adapted to organic cultivation--that used to be all there was. Farmers and gardeners are breeding new open-pollinated varieties today that will be the heirlooms of the future. Some people use “heirloom” to mean any open-pollinated variety, new or old, so if you are looking for old varieties, ask the seller what they mean. HYBRID SEEDS are seeds from the first generation of a cross between two varieties. Plants from hybrid seeds are very uniform and predictable, which is why farmers use them (they might all be ready to harvest the same day, for example). However, the next generation of plants won’t be predictable because it is not a stabilized variety--sometimes they are even sterile. The seed doesn’t ‘breed true” for seed-saving, so you have no choice but to buy new seed over and over. Hybrids make gardeners dependent on the companies who produce the seed. Modern commercial hybrids are usually produced using parent varieties that are secret and are not for sale. (The exact cross is controlled either by hand-pollinating the flowers or by planting one row of plants that are only wanted as pollen donors and the next row with seed-bearers incapable of producing viable pollen.) In practice, this gives the company producing the hybrid a monopoly, because the parentage of the seed is a trade secret. By law, hybrid seeds must be labeled “hybrid” or “F1” next to the variety name. We don’t carry hybrids. We feel that food crops should be a common heritage we all share, not a set of trade secrets. Food independence must include seed-saving for local conditions. GMO VARIETIES are not the result of traditional plant breeding, but of procedures in a laboratory. Instead of using pollen from another plant, technicians can insert genes that don’t even come from plants—some have come from a bacteria or a fish. Often, viruses are used to insert the desired gene. A newer technique for making GMOs is gene editing, often called CRISPR. The main GMO crops are corn, soy, canola, sugar beets, alfalfa, papaya, cotton, and zucchini squash. GMO seeds are mostly sold to big agribusiness farms who sign a contract with the GMO company. The primary danger to home gardens is not from the seeds we buy (GMO seeds are not sold in the home garden packet trade--they are too expensive.) The real concern is pollen in the air contaminating the crops in neighboring fields. The food at the store is likely to have GMOs if it contains corn products—unless it is certified Organic, which doesn't allow them. We do not carry GMOs. ANOTHER FORM OF GENETIC MANIPULATION is called Cell Fusion CMS technology. CMS stands for cytoplasmic male sterility. An example of this technology is the 1996 patent for making chicory hybrids with cellular mitochondria from sunflowers. In this example, a cell from endive and one from sunflower are selectively irradiated to destroy the nucleus of one and the cytoplasm of the other. Their cell walls are dissolved and the cells are merged into a single cell, which is then grown in a laboratory into a plant which cannot produce pollen. It can then only receive pollen from the selected parent variety. This technology meets the definition of genetic engineering under International Organic standards. However, it is not considered GMO in the United States. To date, this procedure is unregulated, and does not disqualify a seed from organic certification. The only way to avoid cell fusion CMS at present is to stay away from hybrids entirely or to research each variety. We do not carry any hybrid seed, and so there are no cell fusion CMS seeds in this catalog. TREATED SEEDS are coated with pesticide or fungicide chemicals after harvest. We don’t carry any treated seed. |