 Hot sauce can be as simple as whirring up a few peppers in the blender, but the best Louisiana hot sauce involves live fermentation, just like pickles. If you've never done fermentation before, hot sauce is a good first project. As always with hot peppers, use gloves, don't touch your eyes or any sensitive skin, and scrub well afterward.
What peppers to use? Hotter than you can comfortably eat. I like Serrano, Criolla Sella or Korean peppers. They are spicy but not lethal, and don't increase in heat after the initial burn. Jalapenos vary wildly in heat, so taste before choosing. Joe's Long Cayenne, is luscious, both hot and sweet. A mixture is fine. You'll need:
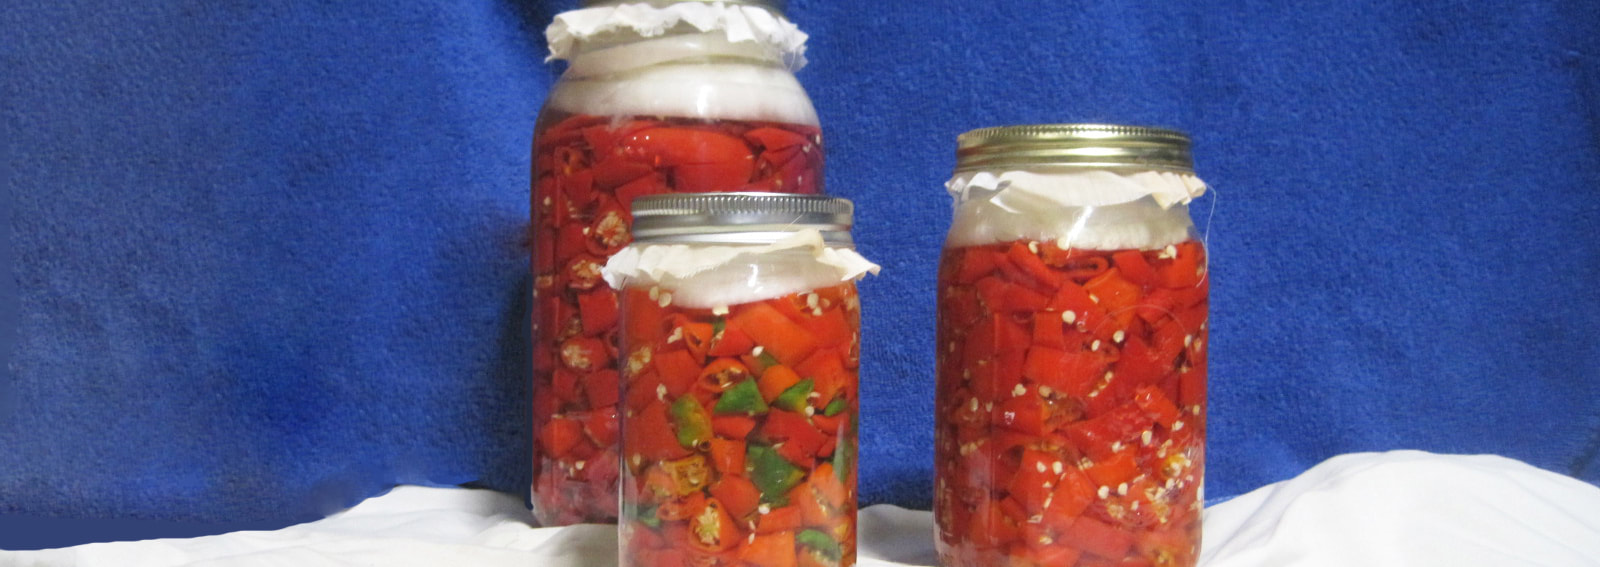
Prepare the peppers: Rinse and drain your peppers. Using gloves and kitchen shears, chop them into a bowl, discarding the stems. If you like a fruitier hot sauce, you can split and deseed the peppers before cutting them in pieces. (I discard the seeds I can get easily, and leave the rest.) The Korean peppers in the photo are in rings 1/2" to 3/4" thick. Now pack the pepper pieces into you clean crock or jars, along with the garlic. You want them to be tightly packed. Leave room for the weight, but not a lot of extra room. Finish off each jar with peppers that are not chopped but instead opened out flat and deseeded. These will help hold down the smaller pieces to keep them from scooting up past the weight. You could also use half an onion for this final layer, as in the photo. Smash down the peppers, try to spread your top layer so little pieces can't get past it, and put the weights on. Believe me, you don't want to try to put the weight on after the contents are floating in brine! Add the whey or pickle juice if using. For the brine: To make a quart (4 cups) of brine, whisk 3 tablespoons of salt into a quart of water. This is enough to do 2 quart jars of peppers.
Fermentation Depending on how warm the room is, fermentation should start in 1-3 days. You will start to see bubbles. Check every other day for white scum and skim it off if any appears. It is a normal part of the process and no cause for alarm. (Save any extra brine to top up.) I would recommend fermenting for 2-3 weeks. When the brine is cloudy, the peppers have softened, and the jar has a nice slightly sour smell, you can stop fermentation and bottle. (Professionals go 4-6 weeks until the mixture is so sour that fermention stops. I don't.) Blending and Bottling If you have multiple jars of peppers, you don't have to bottle them all at once. I still have some jars of fermented peppers in brine in the fridge, useful for adding to salsas and salads. They keep very well in their jars, in the fridge, like pickles. To make the sauce, drain most of the brine off of the peppers into a bowl or cup. Don't throw it away! Put the peppers into the blender or food processor, and add just enough brine so that you can blend it up. (A hand food mill or a tomato-sauce machine would make a nice seedless product if available.) When the sauce is as smooth as you like it, it is ready to use. Thin with the brine to your favorite consistency. Refrigerated, it will keep for a year. To Make a Table Sauce: To make a hot sauce to keep on the table, (unrefrigerated) you need to add more salt and some vinegar. I generally do this with the clear liquid that separates out after the blended hot sauce sits for awhile. For every cup of the thin sauce, add a 1/4 teasp of salt and 2 Tblsp vinegar. That's it. One more blow for self-sufficiency.
8 Comments
10/28/2018 11:42:31 pm
As a person who loves eating spicy food, I make an event to turn the non-spicy foods to spicy ones through dipping it into a hot sauce. Nowadays, buying a hot sauce causes a huge problem in my wallet because it has become too pricey! That's why I want to thank you for posting the ways on how to make a homemade hot sauce recipe. I noticed that it's easy to prepare, a myth that I thought was a difficult one! I will try to do later in the evening! 10/29/2018 09:56:21 am
Like so many kitchen projects, it it very forgiving and simple, as long as you pay attention to the things that count. In this case, the key points are to use the right amount of salt and to keep the peppers submerged as they ferment. Have fun, and may you never run out of hot sauce again! 10/31/2018 10:41:41 am
Spicy foods are my dad's favorite. I can never endure the pain of eating spicy foods because I would always end up crying from the pain. But lately, I have been trying out different foods with hot sauce. I can eat a little amount of hot sauce, but not too much because they hurt my tongue and it always starts to feel like my tongue is on fire. All the hot sauce I use are store bought, so I will try out this recipe to see if this works better for my taste buds. Thanks a lot for the recipe! 9/12/2023 08:20:33 am
The role of online teaching extends beyond academics, as educators often provide emotional support to students. 9/21/2023 10:06:55 pm
Craft compelling captions that tell a story, ask questions, or provide value to your followers. 10/12/2023 12:59:44 am
Vaccination clinics and mobile vet services make it convenient to keep your dog up-to-date on vaccinations, even if you have a busy schedule. Leave a Reply. |
AuthorJamie Chevalier lives and gardens on a river in the Coast Range of Northern California. She has gardened professionally in Alaska and California, as well as living in a remote cabin, commercial fishing, and working with seeds. She is the proprietor of Quail Seeds. Archives
July 2024
|
- Home
-
Shop
- Plant for Summer
-
Vegetable Seeds
>
- Arugula
- Beans
- Beets
- Broccoli and Cima di Rapa
- Cabbage
- Carrots & Roots
- Celery
- Chard
- Corn
- Cucumber
- Eggplant
- Fennel
- Genepools and Landrace Gardening
- Greens
- Kale and Collards
- Lettuce
- Melons
- Oil Crops
- Okra
- Open-Source Seeds (OSSI)
- Onions and Leeks
- Peas
- Peppers
- Spinach
- Squash & Pumpkins
- Sunflowers
- Tomatoes
- Tomatillos/Husk Cherries
- Turnips and Rutabagas
- Perennial Vegetables >
- Flower Seeds
- Herb Seeds >
- Seed Collections
- Pollinator and Pest Control Plants >
- Grains >
- Cover Crops >
- Open Source (OSSI)
- Start these Indoors
- People behind the Seeds >
- Companion Plants
- Recipes >
- Fast, Fresh Food
- Plant for Spring >
- Plant for Fall >
- About Us.
- Blog
- HOW-TO
- Mid-to-Late Summer Sowings
 RSS Feed
Proudly powered by Weebly
- Home
-
Shop
- Plant for Summer
-
Vegetable Seeds
>
- Arugula
- Beans
- Beets
- Broccoli and Cima di Rapa
- Cabbage
- Carrots & Roots
- Celery
- Chard
- Corn
- Cucumber
- Eggplant
- Fennel
- Genepools and Landrace Gardening
- Greens
- Kale and Collards
- Lettuce
- Melons
- Oil Crops
- Okra
- Open-Source Seeds (OSSI)
- Onions and Leeks
- Peas
- Peppers
- Spinach
- Squash & Pumpkins
- Sunflowers
- Tomatoes
- Tomatillos/Husk Cherries
- Turnips and Rutabagas
- Perennial Vegetables >
- Flower Seeds
- Herb Seeds >
- Seed Collections
- Pollinator and Pest Control Plants >
- Grains >
- Cover Crops >
- Open Source (OSSI)
- Start these Indoors
- People behind the Seeds >
- Companion Plants
- Recipes >
- Fast, Fresh Food
- Plant for Spring >
- Plant for Fall >
- About Us.
- Blog
- HOW-TO
- Mid-to-Late Summer Sowings